Multi-Hoop Winding
 Cadfil Help contents
  Cadfil.com Home
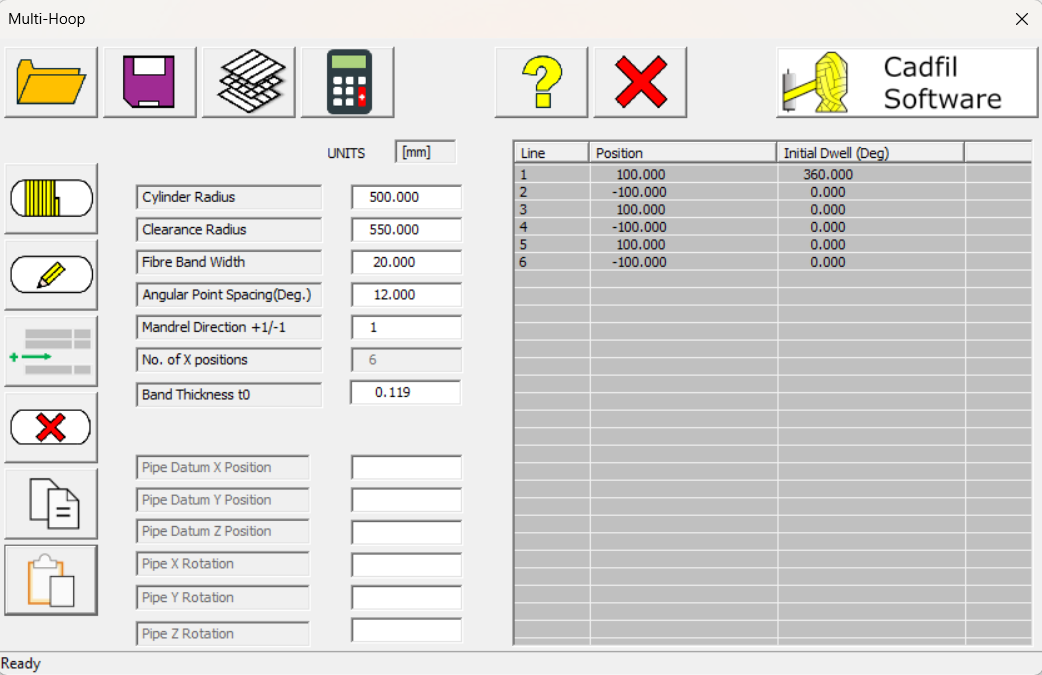
Multiple Hoop winding generates a filament winding program that hoop winds between a series of specified positions on a cylindrical mandrel with an optional dwell (mandrel rotation only) at each of these points. The QuickCad Multi-Hoop winding options generates hoop winding programs and .Pay files that can be used for visualisation based on user specified parameters.
Starting with Cadfil 9.92 some Cadfil dialogs have been getting a new looks with a Ribbon (Tool) Bar with Button Icons. These new dialogs also have a status bar at the bottom to display tool tips that give some description of a ribbon button when the mouse is hovering over it.
Initial Parameters
These user-specified parameters are:
Cylinder Radius
This is the radius of the cylindrical mandrel.
Clearance Radius
This is the distance of the fibre dispensing point from the axis of the cylinder. This MUST be bigger than the mandrel radius.
Fibre Band Width
The width of the fibre band used to determine the winding angle such that the cylinder is fully covered by one circuit i.e. the carriage advances one band-with for each full mandrel rotation.
Angular Point Spacing (Deg)
This value determines the point spacing around the mandrel for generating the payout path. If the user wished to view the hoop winding band structure in the payout path viewing options then use a small value say 12 degrees, for creating NC data for winding a large value say 175 degrees is best. This value must be less than 180 degrees.
Mandrel Direction +1,−1
Set this to 1 for positive mandrel rotation and −1 for negative mandrel rotation.
Number Of X Positions
NOTE: From Cadfil 992, Number of X positions is filled in automatically, the user cannot input this value.
This is the number of X positions and is a whole number. For example if three is specified the user is expected to specify X position 1 (X1) and dwell angle 1 (DW1) as well as X2,DW2 and x3,DW3 so in this example the machine would move to the first mandrel position and the mandrel will rotate DW1 degrees, the machine will then hoop wind (on a helical lead equal to the bandwidth) to the second position X2 and will then dwell for DW2 degrees, finally the machine will then hoop wind to position X3 and dwell for DW3 degrees.
If in this example X3=X1 we would have the sample program as the normal hoop winding program with a winding length of X2-X1
The number of positions has no practical limit, if tthe table is long a vertical scroll bar will appear on the table. In Cadfil versions before 992, the maximum number of positions was 20 and if more than 20 are required used more than one multi-hoop programs to do this.
WARNING
for older Cadfil versions: the values of the number of positions MUST match the number specified, if the user specified X1,X2,X3 & X4 but only set the number of points to 3 then X4 and dwell 4 would be ignored (and not saved). If only X1,X2 & X3 were set but the points were set to 4 then X4 would be assumed to be zero and the program would hoop wind to mandrel position X=0User Buttons
Open/Save
The Open button can be used to open and read a parameter file (.par) with existing Multi-Hoop data. The SAVE button saves the current parameter data, and if a name has been pre-set using "Open" this will be the default but you can also save the data as a new name.
Material Recipe Selection
This allows material selection fibre, resin, number of rovings, volume/mass fraction. A predefined recipe can also be selected. Material selection has its own main topic, Material Database
Calculate
The Calculate button should be used at the very end when the design is complete. It creates the mandrel file, thickness file, and payout file for post-processing.
Add Layer
The Add button adds a new line to the table, when it is clicked, it opens the 'Line Modify Panel' shown below. The Add function will always add the new layer at the end of the winding list
Edit Layer
The Edit button opens the selected line in the 'Line Modify Panel' shown below. You can also open the line modify window by double clicking the line you wish to edit. If you wish to change the values of a line, you can edit them in this window, before using 'ok' to save the new data over the existing line.

Insert Layer
The Insert button has a similar function as the Add button, creating a new line using the data input. However, the Insert button will place the new layer at the selected line in the list, not at the end of the list.
Delete Layer
The Delete button will delete a selected line or lines from the list of layers.
Copy Layer
The Copy button will copy selected lines from the list of layers. It is possible to select multiple lines in the table simultaneously using shift+click or ctrl+click. Copy saves the data from the Position and Dwell columns (Line is not included). Copied data can be pasted to external software such as spreadsheets if required.
Paste Layer
The Paste button will paste new lines to the list of layers from the clipboard. This data should be in the format of 'position,dwell' for each line. This may be copied from previous layers if you wish for them to repeat. It is also possible to paste directly from other software options like spreadsheets. If a blank line (or no line) is selected the data is added after the last item. If a line is selected the new data is inserted above that line.